Feeds:
Posts
Comments

Posts Tagged ‘Wedding Decor’

I am a MASSIVE fan of Paper Flowers.

I love that they can be created by anyone,
at any time of year
and any place on Earth.

Roses in the middle of winter?
No probs!
Chrysanthemums in summer?
Absolutely!
Tropical orchids for a snowy winter wedding?
Can do!
Succulents and eucalyptus for equatorial nuptials?
Totes!

But even more wonderfully,
if you have a turquoise or plum or tangerine colour theme,
but really want to have peonies in your floral displays,
then just make them.

Oh the possibilities!

I will make the effort to post some of my own Paper Flower tutorials here soon
(I’m trying to learn how to make & post a video),
but for now,
let me introduce you to Lia Griffiths.

Lia is one of my all-time-favourite paper crafters.
I genuinely adore her work and believe that she is one of
the most generous Craft Bloggers out in the Interweb.

.

Rustic_Paper_Fower_Bridal_Bouquet_DIY

.

She has made and shared tutorials to make a whopping
SEVEN
different floral pieces for a Rustic Bridal Bouquet.

.

DIY_Flower_Foilage_Paper_Rustic

.

Beautiful, don’t you agree?

.

Paper_Flower_Bridal_Bouquet_DIY.

So head on over to Lia’s blog, and edify yourself on the easy and fun ways to create some beautiful flowers for your own pleasure.

I told her that you were coming, so she’s expecting you 😉

 .

.

.

.

.

Read Full Post »

I am a tiny bit in love with succulents.

It started five and a half years ago when I first moved into the Purple House . . . . I had no money, very little time, the backyard was impossibly undulating (not a flat spot anywhere) & south facing (darkest aspect in the Southern Hemisphere). So I started planting succulents in white-washed terracotta pots, sticking them here and there and my passion was fully imbedded.

More and more I have been using succulents in my craft.

As they are such tough little specimens, they lend themselves to experimentation. For example:

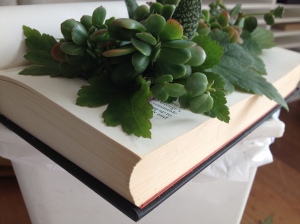
Vintage Book - Succulent Planter

Vintage Book – Succulent Planter

and

Recycled Timber - Planter Box

Recycled Timber – Planter Box

. So when I came across this sublime collection of photos on Thinx I just had to share them . . .

.Passionflower Succulents . After some investigation I stumbled across the original artist . . . Susan McLeary. She makes and sells her incredible creations on her Etsy shop: Passionflower To Wear.

Isn’t she talented?

. . . . .

Read Full Post »

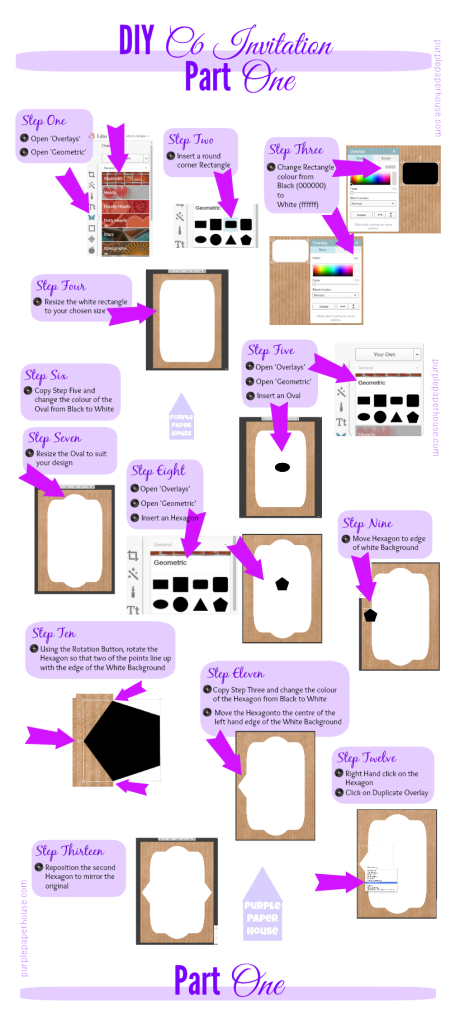
In Part One
I showed you how to create a ‘Woodsy’ background
for a Postcard-Sized DIY Invitation.


Completed Part One

Completed Part One

I made it as detailed as possible
so that you would feel comfortable if you wanted to create
a different themed background.

So, how did you go?

.

Now it’s time for Part Two
– creating a white overlay to create the completed background,
ready to add text and graphics – the absolute best bit of creating the invitation

.

Part Two - White overlay  over woodsy background

Part Two – White overlay
onto woodsy background 
(Part One)

Are you ready to rock and roll?
Here we go . . . .

.

Part Two.

Now VERY importantly – don’t forget to SAVE this to your desktop,
ready for the final stage – Part Three.

If you have forgotten how to save your background,
go to my instructions here.

.

And, if you do create an invitation yourself – show it off!
Upload a copy in the ‘Comments’ or link to your own blog.

I’d LOVE to see your efforts.
Truly.

.

.

.

.

.


Read Full Post »

I wrote a blog post about a  few video tutorials
Fancy Script Letters here on my crafty blog.

I really think that with very little practice
you can make your own beautiful
place cards
or other table decorations for your wedding.

Here is my step by step process
to practising and perfecting your own
handwritten table decorations.

Step One
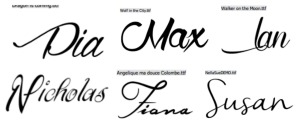
Have a quick goosey-gander at some cool fonts online and select one that you would like to replicate.

.

.

.

`Fonts

Some cool fonts

.

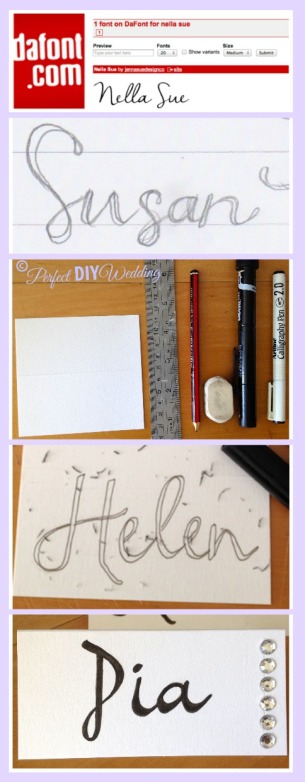
Step Two
Have a practice, playing with the angle, swirl, size and style of fonts.
You will quickly find a font that you love recreating.

Tools

Tools

.

Playing and sketching with fonts

Playing and sketching with fonts

Step Three
Just start!
A lot of what holds us back when we create (DIY projects)
is that we compare our work to a perfect examples.
Banish this mentality and just start creating your beautiful work.
Use a pencil if this gives you more confidence 🙂

.

.

Step Four
Give yourself ample time to make your place cards
ensuring that you have time and resources to make some last minute copies.

After a bit of practice,  these only took me  5 minutes each

After a bit of practice,
these only took me
5 minutes each

You know that there will be at a couple of guests who RSVP
after you have finished all the others!

.

For those of you who just can’t stand the thought of doing this much DIY,
head over to my post here, on printing your own place cards.
easy peasy japanesey!

.

.

.

.

.

.

.

Read Full Post »

Hi Peeps

It’s been a hassle trying to update one of my old posts,

– and my most popular –

that gave Brides a fantastic link and instructions
to make perfect place cards for their Big Day.

But now it’s done. Phewww!

Go here, and get all the FREE goodness 😀


Pia xxx

.

.

.

.

.

.

Read Full Post »

I just had to share this über cool wedding of Amy & Julian in Sydney
via Green Wedding Shoes website.

The styling and atmosphere are sublime.

Look and enjoy!

Amy & Julian

Read Full Post »

If you compare wedding magazines & blogs with the material available ten,
even five,
years ago you will see a major shift in decor and fashion.
And atmosphere!

Although Formal Weddings are still favored by many,
a definite ‘relaxed’ element has now infiltrated
wedding design & planning.

Now weddings have ‘themes’ . . .

* Rustic Chic
* Vintage
* Classic Country
* Carnival/Circus/Superheroes/Steampunk
* Retro
* Handmade/DIY

In the coming weeks I will provide lots of links and images of these styles,
to help you on your quest for the wedding of your dreams.

If you want some particular styles or images, you’ll have to let me know.
I have hundreds to choose from.
And I may have just the perfect ones for YOUR wedding day.

Some are just divine!

Vintage Repose


Read Full Post »

When I get married, there are a few things that I will spend ‘the’ money on.
One of them is the photographer.

A good photographer will memorise the wonderful day on film.
A great photographer will make the day even more memorable.

………………………………………….

Later this afternoon I will post some links of my favourite photographers
so you see what I mean,
however in the meantime I want to show you a fabulous idea.

I’m sure you’ve seen something similar before,
however making it look FUN! may be the difference between making the suggestion
and getting the actual photographs.

. . . . .

Would you include something similar on your guests’ tables?

Read Full Post »

While my Polar Bear loves me and adores me, and while I cherish and love him back – I think I may have just found something to steal some of that love . . .

Tickle the Imagination is an online publication that is FREE [first hint of infidelity]
It’s Perth based – so it’s local(ish) [second hint of infidelity]
It’s about DIY weddings [third hint]
It has real DIY tips from REAL brides (and some grooms)
[Now you can see – I was always at real risk of cheating]

Thank you to Cool Chris from Pikmee Designs for the ‘heads up’ about Tickle the Imagination.

I’m in LOVE

Click on image to go straight to the online mag : )

Read Full Post »

For the past few months I have been working with Lauren & Grant for their wedding, which is this Friday.

Lauren has done quite a few things herself,
some of which I think are such personal and gorgeous touches.

She’s made grapefruit marmalade with her m-i-l, bottled and then labelled them all (103 jars, if you don’t mind). She’s also bought and altered a small wooden gate as a make-shift canape menu board.

She also wanted to decorate some wooden letters for the present table,
but . . . time just wasn’t there.

So I offered to do it!

Here’s the start of the project.

These have been painted with Blackboard paint on the sides and back so that guests can write (with white pen) their well wishes

After two coats, it now needs a really good sand and two more coats.

 I’ll have lots of photos on Friday for you : )

Read Full Post »

Older Posts »